
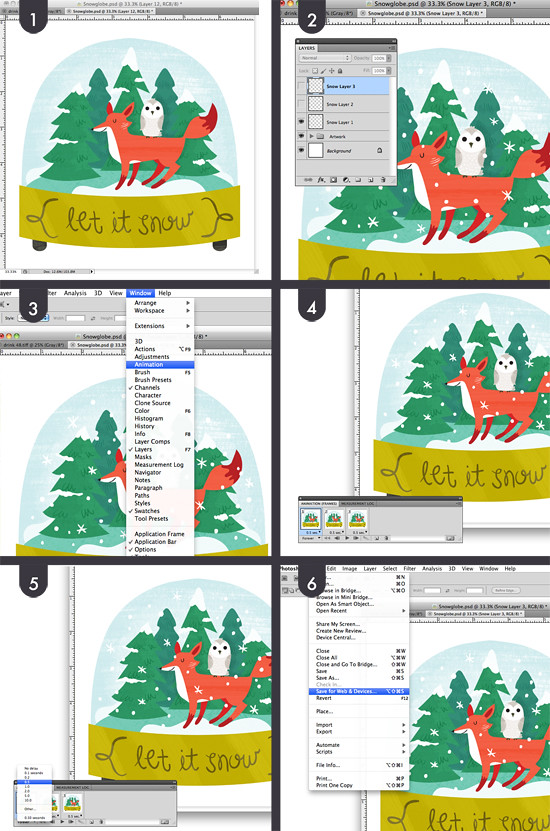
In a few easy steps you too can have an awesome GIF illustration! Step #1 create a super cool illustration that you want to add some animated elements to. Once you have your image move on to step #2 - adding the stuff you want to move about, in this instance snow.
For my illustration I created three separate layers of snow that will alternate when the GIF is in motion. There were more frames used in some of the other snow globes. For step #3 you'll have to access the animation palette from the window drop down menu. If your animation palette is in a different view mode you can adjust it by clicking the button in the lower right side of the window.
Step #4 - Once you have the palette open add your frames. Each frame will be representational of what layers you have visible while it's selected. For my first frame I have the first layer of snow visible, and the others hidden. For the second frame - the second layer of snow, and so on.
Step #5 - Once you have your frames set you can adjust their play times using the options directly under each individual frame. In the lower left side of the window you can set the amount of times the animation loops - our snow globes are set (doomed to repeat) forever. This brings us to step #6, and your'e almost done! To save this GIF for web viewing choose "Save for Web & Devices" from the File drop down menu. When the window pops up make sure the file type is set to GIF, click save, and you should be good to go! Behold the magic of the animated GIF!
This looks brilliant- sorry if this is a really obvious answer but what program are you using? Is it photoshop? Thanks for sharing. Mel
ReplyDeleteOh, it's Photoshop! I should probably mention that in the post, huh?
ReplyDelete